Monday 16 February 2015

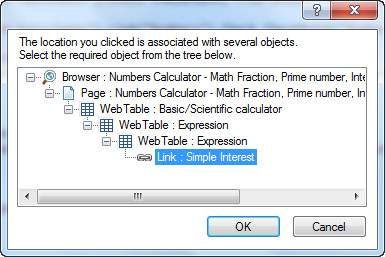
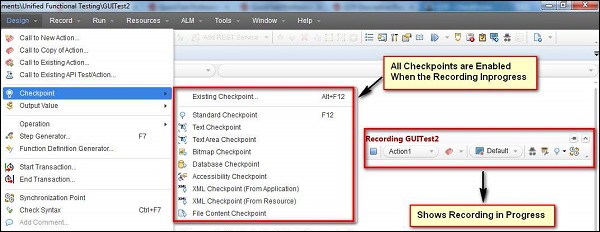
Sometimes, QTP is unable to find any object that matches the recognized object description or it may find more than one object that fits the description, then QTP ignores the recognized description and uses the Smart Identification mechanism to recognize the object.
QTP's Smart Identification uses two types of properties:
  • Base Filter Properties - The basic properties of a particular test object class whose values cannot be changed without changing the essence of the original object.
  • Optional Filter Properties - Other properties also assist in identifying the objects of a particular class whose properties are unlikely to change often but can be ignored if they are no longer applicable.

Enabling Smart identification for an object:

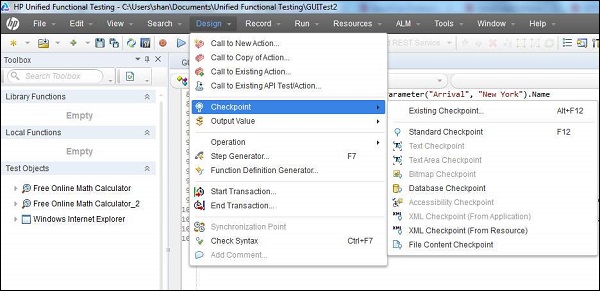
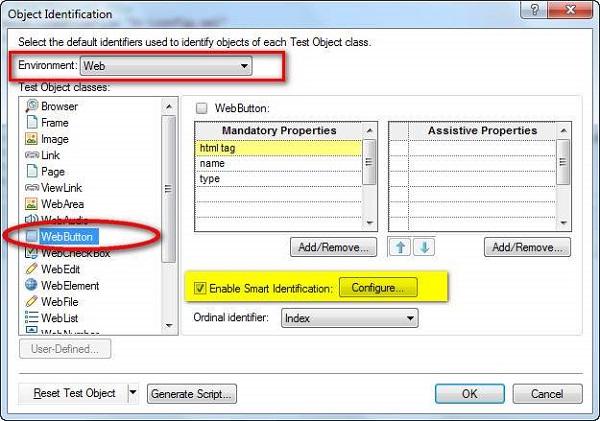
Step 1 : Navigate to "Tools" -> "Object Identification". Object Identification Dialog Opens.
Step 2 : Choose the Environment, Object Class and Turn ON "Enable Smart Identification" as shown below:
Smart Identification Configuration
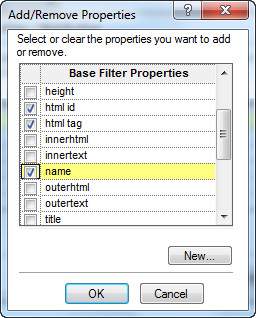
Step 3 : Click Configure and choosing the base and Optional Filter Properties.
Smart Identification Configuration
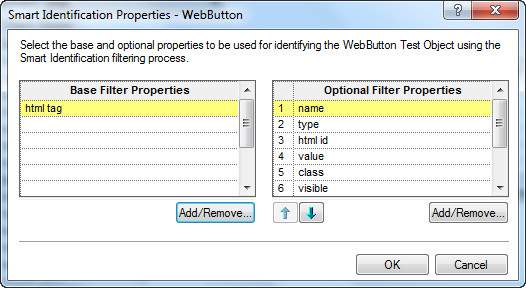
Step 3 : Add Properties in Base Properties apart from the Default one and also add/remove Optional Filter Properties. Please Note that Same properties cannot be part of both Mandatory and Assistive Properties and click "OK".
Smart Identification Configuration
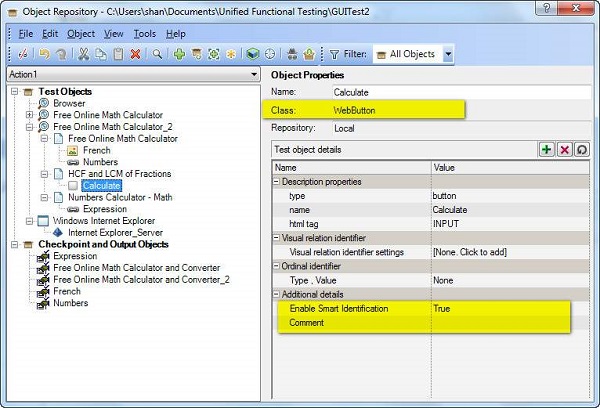
Step 4 : Verifying if the Smart Identification is Enabled after Adding object of that type in the Object Repository. Smart Identification is Set to TRUE. We can also make it False in case we dont want to enable Smart Identification.
Smart Identification Configuration
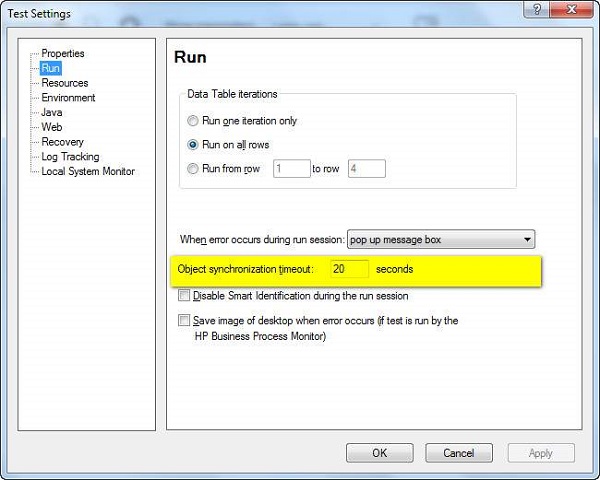
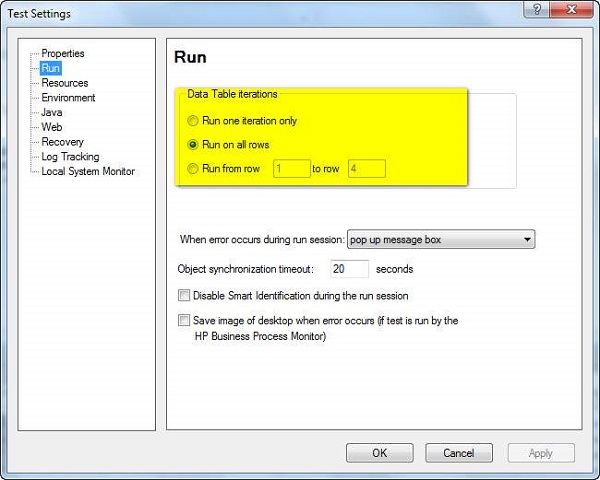
Step 5 : We can even disable a test Level by applying at test script level under "Settings" of "File" Menu as shown below:
Smart Identification Configuration
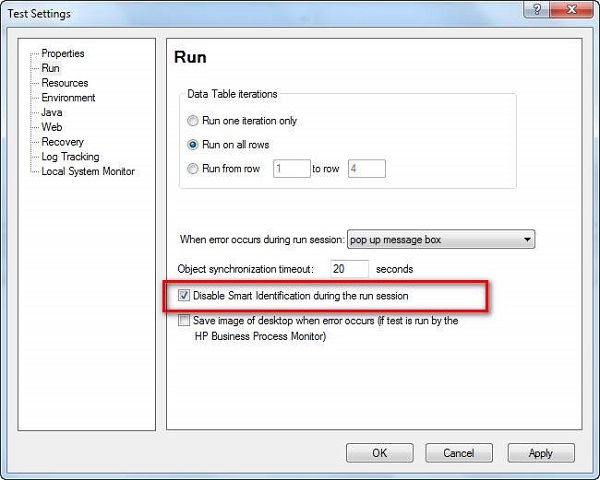
Step 6 : If the Smart Identification is disabled as per Step# 6 then it wont apply smart identification for any object during script execution.
Step 7 : In case objects are added with Smart Identification as Off, QTP won't use Smart Identification for recognizing in future, even though we have enabled it afterwords.

What is Synchronization?

Synchronization point is the time interface between Tool and Application under test. Synchronization point is a feature to specify delay time between one step and another of the test script.
For Example, clicking on a link may load the page is 1 second, sometimes 5 seconds or even it might take 10 seconds to load it completely. It depends on various factors such as the application server response time, network bandwidth , client system capabilities etc.
If the time is varying then the script will fail unless the tester handles these time differences intelligently.

Ways to Insert Sync Point:

  • WaitProperty
  • Exist
  • Wait
  • Sync(only for web based apps)
  • Inserting QTP Inbuilt Synchronization points.
Let us say we need to insert a sync point beween clicking on "numbers" link and clicking on "simple Interest" calculator of in "http://easycalculation.com/". We will now take a look at all the 5 ways to insert sync point for the above scenario.

METHOD 1: WAITPROPERTY

WaitProperty is a method that takes the property name, Value and Timeout value as input to perform the sync. It is a dynamic wait and hence this option is encouraged.
' Method 1 - WaitProperty with 25 seconds
Dim obj
Set obj = Browser("Math Calculator").Page("Math Calculator")
obj.Link("Numbers").Click

obj.Link("Simple Interest").WaitProperty "text", "Simple Interest",25000
obj.Link("Simple Interest").Click

METHOD 2: EXIST

Exist is a method that takes the Timeout value as input to perform the sync. Again it is a dynamic wait and hence this option is encouraged.
' Method 2 : Exist Timeout - 30 Seconds
Dim obj
Set obj = Browser("Math Calculator").Page("Math Calculator")
obj.Link("Numbers").Click

If obj.Link("Simple Interest").Exist(30) Then
 obj.Link("Simple Interest").Click
Else
 Print "Link NOT Available"
End IF

METHOD 3: WAIT

Wait is a hardcoded sync point which waits independent of the event happened or NOT. Hence usage of Wait is discouraged and can be used for shorter wait time such as 1 or 2 seconds.
' Method 3 : Wait Timeout - 30 Seconds
Dim obj
Set obj = Browser("Math Calculator").Page("Math Calculator")
obj.Link("Numbers").Click
wait(30)
Browser("Math Calculator").Page("Math Calculator").Link("Simple Interest").Click

METHOD 4: SYNC METHOD

Sync Method can be used only for web applications where there is always a lag between page loads.
' Method 4 : 
Dim obj
Set obj = Browser("Math Calculator").Page("Math Calculator")
obj.Link("Numbers").Click

Browser("Math Calculator").Sync
Browser("Math Calculator").Page("Math Calculator").Link("Simple Interest").Click

METHOD 5 : INSERTING QTP INBUILT SYNCHRONIZATION POINTS:

Step 1 : Get into Recording Mode. This Option Would be Disabled if the user is NOT in Recording Mode.
Step 2 : Goto "Design" -> "Synchronization Point" .
Step 3 : We need to Select the object which we want to be the Sync Point. After Selecting the object, object window opens as shown below:
QTP Sync Point
Step 4 : Click Ok, the "Add Synchronization Window" Opens up. Select the Property, Value and Time out value and click ok as shown below:
QTP Sync Point
Step 5 : The Script would be generated as shown below which is the same as that of the WaitProperty(Method 1) that we had already discussed:
Browser("Math Calculator").Page("Math Calculator").Link("Numbers").Click
Browser("Math Calculator").Page("Math Calculator").Link("Simple Interest").WaitProperty "text", "Simple Interest", 10000

Default Synchronization:

When user hasn't used any of the above sync methods, still QTP has inbuild Object synchronization timeout which can be adjusted by the user.
Navigate to "File" >> "Settings" >> Run Tab >> Object Synchronization Time out as shown below.
Default Synchronization Time Out

What are CheckPoints?

Checkpoints, as the name says it all, it refers to a validation point that compares the current value for specified properties or current state of an object with the expected value which can be inserted at any point of time in the script.

Types:

TypeDescription
Standard CheckpointVerifies the property values of an object in application under test and supported by all add-in environments.
Bitmap CheckpointVerifies an area of your application as a bitmap
File Content CheckpointVerifies the text in a dynamically generated or accessed file such as .txt,.pdf
Table CheckpointVerifies the information within a table. Not all environments are supported.
Text CheckpointVerify if the text that is displayed within a defined area in a Windows-based application, according to specified criteria.
Text Area CheckpointVerifies if the text string is displayed within a defined area in a Windows-based application, according to specified criteria.
Accessibility CheckpointVerifies the page and reports the areas of the Web site that may not conform to the World Wide Web Consortium (W3C) Web Content Accessibility Guidelines
Page CheckpointVerifies the characteristics of a Web page. It can also check for broken links.
Database CheckpointVerifies the contents of a database accessed by the application under test.
XML CheckpointVerifies the content of the .xml documents or .xml documents in Web pages and frames.

Inserting CheckPoint

When the user wants to insert a checkpoint, one has to ensure that most of the checkpoints are supported during the recording sessions only. Once the user stops recording, checkpoints are NOT enabled.
Below is the checkpoint menu, when the user is NOT in the recording mode.
Check Point Menu when Recording NOT in Progress
Below is the checkpoint menu, when the user is in the recording mode.
Check Point Menu when Recording is in Progress

Example:

The checkpoints are added for the application under test - "http://easycalculation.com/"
' 1. Inserted Standard Checkpoint
Status = Browser("Math Calculator").Page("Math Calculator").Link("Numbers").Check CheckPoint("Numbers")

If Status Then
   print "Checkpoint Passed"
Else
   Print "Checkpoint Failed"
End if

' 2. Inserted BitMap Checkpoint
imgchkpoint = Browser("Math Calculator").Page("Math Calculator").Image("French").Check CheckPoint("French")

If imgchkpoint Then
   print "Checkpoint Passed"
Else
   Print "Checkpoint Failed"
End if

Viewing Checkpoint Properties

After Inserting, incase a tester want to change the values, we can do so by performing right click on the keyword 'checkpoint' of the script and navigating to "Checkpoint Properties" as shown below:
Check point properties.
You can locate the same checkpoints in object repository as well as shown below. It exactly shows what type of checkpoint and what are the expected values, time out values.
Check point properties.

Datatables:

A DataTable, similar to Microsoft Excel helps testers to create data driven test cases that can be used to run an Action multiple times. There are two types of Datatables.
  • Local Data Table - Each action has its own private data table also known as local data table which is can also be accessed across actions.
  • Global Data Table - Each test has one global data sheet that is accessible across actions.
The Data sheet can be accessed from the "Data" Tab of QTP as shown below:
Data Table in QTP
To execute a test case for some specified number of iterations,one can set the iterations of global data table in the Test Settings dialog, that can be accessed using File -> Settings -> Run(Tab) as shown below:
Data Table in QTP

Example:

For Instance, if user wants to parameterize "compound Interest" of "http://zubaerkhan.com/" that can be accessed using "http://zubaerkhan.com/compound-interest.php". The Parameters can be created as shown below. Most of the functionalities of Excel can be used in Data table as well.
Data Table in QTP

Data Table Operations:

There are three types of objects to access Data Table. Data Table Operations can be well understood by traversing through the below link:
Object TypeDescription
Data Table MethodsGives Detailed information about the data table methods.
DTParameter Object MethodsGives Detailed information about the DTParameter methods.
DTSheet Object MethodsGives Detailed information about the DTSheet methods.
Actions:
Actions helps testers to divide scripts into groups of QTP statements called actions. Actions are similar to functions in VBScript, however there are few differences. By Default QTP creates a test with 1 action.

Actions Functions
Actions are inbuild feature of QTP. VBScript Functions are supported by both VBScript and QTP.
Actions parameters are passed byvalue only. Function parameters are passed either by byvalue or byref.
Actions have extension .mts Functions are saved as .vbs or .qfl
Actions may or maynot be reusable. Functions are always reusable.
The properties of the action can be accessed by Right Clicking on the Script Editor Window and Selecting "Properties".


Action properties contains following information


Action Name

Location

Reusable Flag

Input Parameters

Output Parameters

Types of Actions:
There are three types of actions:
Non-reusable action - An action that can be called only in that specific test in which it has been designed and can be called only once

Reusable action - An action that can be called multiple times any test in which it resides and can also be used by any other tests

External Reusable action - It is a reusable action stored in another test. External actions are read-only in the calling test, but it can be used locally with the editable copy of the Data Table information for the external action

Working with Actions:
There are three options to insert an action. Click on each one of those to know more about the selected type of action.

  • Action Type Description

  • Insert Call to New Action Inserts a New Action from the existing action
  • Insert Call to Copy of Action Inserts a copy of an existing action
  • Insert Call to Existing Action Inserts a call to existing re-usable action


Object Repository:


Object Repository:
Object Repository is a collection of object and properties with which QTP will be able to recognize the objects and act on it. When a user records a test, the objects and its properties are captured by default. Without understanding objects and its properties, QTP will NOT be able to play back the scripts.

Click on each one of the below topics to know more about Object Repository and its associated features.

  • Topic Description

  • Object Spy and its Features To Understand the usage of object Spy and its associated functionalities.
  • Working with Object Repository Adding,Editing, Deleting Objects from a Object Repository and its associated functionalities.
  • Types of Object Repository Deals with Shared Object and Local Object Repository and their context with respect to scripting.
  • User-defined Objects Deals with the circumstances to use the User-Defined Objects.
  • Object Repository in XML Deals with coverting OR's to XML and how to use the object Repository as XML.
  • Comparing and Merging OR Operations such as Compare OR', Merge OR's to effectively work with Object Repository.
  • Ordinal Identifiers Circumstances when the ordinal identifiers are used and their advantages.
  • Child Objects Using Child Objects for effective scripting


Significance of Record and Playback:
It is used as the preliminary investigation method to verify if UFT can support the technology/application.

Used to create a test a basic functionality of an application or feature that does not require long-term maintenance.

It can be used for recording both mouse movements and keyboard inputs.

Modes of Recording:
Normal Recording: This is the default Recording mode that records the objects and the operations performed on the application under test.

Analog Recording: This records not only the keyboard actions but also the mouse movements relative to the screen or the application window.

Low-Level Recording: This records the exact co-ordinates of the objects independent of the fact whether UFT recognizes the object or NOT. It just records the co-ordinates, hence does NOT record mouse movements.

Insight Recording: UFT records operation based on its appearance and NOT based on its native properties.

How to Choose Recording Modes:
Upon clicking on Recording button, user can choose the recording mode from the recording pane that appears on the screen once recording starts. The selection can be made from any the ones that has been discussed above.


The Below Scenario is recorded in all the modes and see how the same action has been recorded under various circumstances.

Launch IE - http://zubaerkhan.com/

Click "Numbers" under "Algebra"

Click "Square Root" link

Enter a value to calculate the square root. Let us say 10

Hit Calculate

Script Recorded under Default, Analog and Low Level Recording Mode.

Record and Playback

Recording a test corresponds to recording the user actions of the application under test so that UFT automatically generates the scripts that can be played back. Record and Playback can give us the first impression if the tool can support the technology or NOT if the initial settings are done correctly.

Steps for Record and Playback are as follows:

Step 1: Click on "New" test from the Start Page as shown below:


2.Step 2: Upon Clicking, "New" Link, the new test window opens and the user need to select the test type. Select "GUI Test", give a name for the test and also the location where it needs to be saved


3.Step 3: Once a New test is created, the new test screen opens as shown below. Now, click on "Action1" Tab which is created with 1 action by default.


4. Step 4: Click on "Record" Menu and select "Record and Run Settings" as shown below:


5.Step 5: The Record and Run Settings Dialog opens and based on the type of application, one can select i.e Web, Java, Windows Applications. For Example, We will record a Web Based Application (http://easycalculation.com/)


6. Step 6: Click Record Button, the Internet Explorer opens automatically with the webaddress http://easycalculation.com/ as per the settings. Click "Numbers" link under "Algebra" and key in a number and hit "calculate". Upon completion of the action click "Stop" button in the record panel. You will notice that the script is generated as shown below:


7. Step 7: Now playback the script by clicking on the playback button. The Script replays and result is displayed.


8. Step 8: The result window is opened by default which exactly shows the timestamp of execution, pass and failed steps.